Today is #406day or 406 MHZ Beacon Awareness Day! What does that mean? The day is intended to create online and media awareness on the benefits and responsibilities of owning a 406 MHz beacon; beacons such as Emergency Position Indicating Radio Beacons (EPIRBs) or Personal Locator Beacons (PLBs).
One hiker on the PCT perished last year while in possession of a PLB that was not charged and another hiker went missing and is still missing in 2016 on the PCT that was in possession of a PLB that they had failed to register. Keep in mind that pushing the button on an non registered PLB will STILL send out the SOS, but it is possible that hiker didn’t know that. I now carry a PLB at all times, even on busy trails.
Possessing a beacon and knowing how to use it can save your life. In addition to knowing how to use your beacon, it’s important to 1) Check your 406 MHz beacon battery expiration date. 2) Test your beacon.
What is a 406 MHz Personal Location Beacon (PLB)?
406 MHz beacons are a type of portable emergency equipment that transmits a distress signal to search and rescue (SAR) organizations. The purpose of these beacons is to aid SAR teams in tracking and locating ships or individuals in jeopardy as rapidly as possible. The 406 MHz frequency is a worldwide dedicated emergency frequency that is detected by a network of satellites called the Cospas-Sarsat system. This satellite system was established by, and continues to be supported by, its primary benefactors – the USA, Russia, Canada and France. The Cospas-Sarsat system has saved over 30,500 lives – and counting – since its inception. To learn more about the system visit www.cospas-sarsat.org.
In addition to PLB’s like the one by ACR that I talk about in the video, there are also Satellite Messengers that have text message capability by Spot and Delorme. Text messaging will also require a subscription, however, so if you just need a PLB for if things go bad at the lowest cost with no subscription and don’t need to pass messages home like “Made it to camp!”, then a ACR ResQLink+ is a great option. Notice the + at the end of the model name, this means it is the waterproof model, making it great for sailing as well as on land adventures and only costs a few bucks more. And at only 5.4 ounces and 4.5 inches long, it’s a no brainer as the world’s smallest PLB for only a couple hundred bucks. The steps below apply to all brands and types of beacons, but I’ve specified for the model I own and use, the ACR ResQLink+.
Step 1: Register Your Beacon
The national authority that accepts registrations in the United States is the National Oceanic and Atmospheric Administration (NOAA). All 406 MHz beacons transmit a Unique Identifier Number (UIN) when activated. This UIN is programmed into the beacon based on the country in which the beacon is registered, thus authorities are able to determine which country’s database will have your registration information. Search and Rescue (SAR) forces will have information as to who you are as the owner of the beacon, the name and type of vessel that you have (if applicable), your address, and who to contact that might know of your current situation – but only if your beacon has been properly registered. Valuable search and rescue resources are wasted every year responding to false alerts, and registering your beacon helps to resolve this quickly.
Step 2: Learn How Your Beacon Works and How To Activate It!
Read the manual! The buttons, the things, all the things ….. know how they work! How many beeps and red or green flashes means a successful signal has been sent? What flashes indicate failure? You need to know this when you are in the middle of nowhere with no instructions and no internet so you are never second guessing activation has occurred successfully!
Step 3: Test Your Beacon and Check Battery Expiration
The battery on my ACR lasts for 5 years, know and check your expiration date sticker on the back on a regular basis and learn how to test your unit using the two test below.
Basic Self Test (Perform in first 5 minutes of any hour.)
During a Self-test your beacon will send a 406 MHz signal coded as Self-test to the satellite system and a 121.5 MHz homing signal. An ACR ResQLink+ beacon has enough excess battery life to perform 60 self tests over the 5 year life of the battery.
 Unclip the antenna latch from the case.
- Move the antenna into the upright position.
- Depress the Test button for 1 full second.
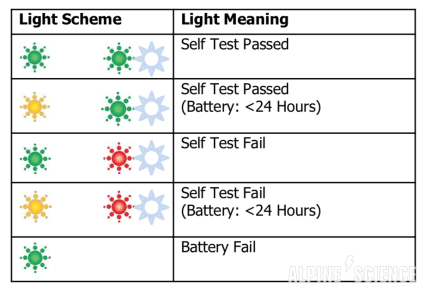
A Green Light will flash followed by a Second Long Green Light flash and the strobe light. This indicates a successful Basic Self Test.
If a red LED flashes at the completion of the Self-test, your beacon has failed. Repeat the Self-test. If the failure persists, contact ACR Electronics or an authorized Battery Replacement Center for servicing of your beacon.
GPS Self Test (Perform outdoors with clear view of the sky.)
An ACR ResQLink+ beacon has enough excess battery life to perform 12 GPS self tests over the 5 year life of the battery.
 Unclip the antenna latch from the case.
- Move the antenna into the upright position.
- Depress the Test button for 1 full second.
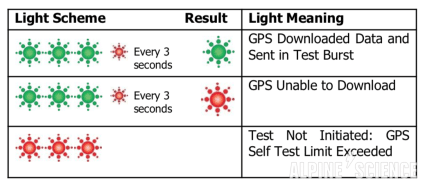
3 Green LEDs will flash followed by a continuous series of RED flashes until GPS has been downloaded into the beacon. Once valid GPS data has been obtained, a long GREEN flash will appear followed by a flash of the Strobe Light. This indicates a successful GPS Self Test. This will take no longer than two minutes.
3 Red LEDs at the start of test indicates that 12 GPS test have been performed; the test will not run.
If at the end of the GPS Self Test, a long Red light appears, this indicates that the beacon was unable to find your GPS coordinate.
Battery Witness Seal Life
If your beacon flashes an initial Amber light at the beginning of the Self- test, this indicates that your electronic witness has been broken and you have used more than 1 hour of battery life. While the beacon will still operate normally in a distress situation, ACR strongly recommends you have your battery replaced and the electronic witness reset to ensure that you will have at least 24 hours of battery power.
Anatomy of a Beacon Activation for Search and Rescue (SAR)
When a 406 MHz beacon is activated, the digital distress message is sent to Cospas-Sarsat satellites and, in turn, the distress message is relayed to SAR forces. The distress message contains the beacon UIN and on some models the GPS location of the beacon. Additional information about the beacon is accessed by SAR forces from the beacon registration database. At the same time the 406 MHz signal is activated, a 121.5 MHz signal is turned on. The 121.5 MHz signal is used by SAR forces to home in on the beacon as they approach it.
The 406 MHz signal is detected by multiple satellites and from that information the location of the beacon can be calculated. This data alone is sufficient for SAR to find persons or ships in distress in a reasonable timeframe. However, as a further enhancement, some beacons have a GPS engine onboard. This feature allows the beacon to acquire current location coordinates from an internal GPS receiver. The purpose of this feature is to send an even more precise location of the beacon to the satellites, i.e., latitude and longitude data. This helps SAR to reach the location even faster.
Order of Operations
- Distressed mariner/outdoor adventurer/pilot activates beacon (EPIRB, PLB, ELT).
- Beacon transmits a 406 MHz emergency message containing your Unique Identifier Number (UIN) to the LEOSAR (polar orbiting) and GEOSAR* (geostationary) satellite systems.
- The satellites relay the 406 MHz emergency message to a ground station called the Local User Terminal (LUT). The LUT calculates the location of the signal by measuring the Doppler shift caused by the relative movement between the satellite and the beacon and forwards the location to the Mission Control Center (MCC).
- The MCC continues to receive information from additional satellite passes and further refines the beacon position (2.3 NM search radius). An alert message is generated that is combined with the registration information from the database and is forwarded to the appropriate Rescue Coordination Center (RCC).
- The RCC makes contact with the persons listed in the database to verify the existence of an emergency and gathers additional information about the beacon users. The RCC will dispatch the closest, capable Search and Rescue (SAR) forces.
- Local SAR forces launch a rescue mission and use the 121.5 MHz homing signal to pinpoint the beacon.
* On average, worldwide, this notification (steps 2 through 5) take up to one hour for non-GPS beacons. For self-locating beacons that provide GPS position data in their first transmissions, the search radius is reduced to .05 NM (100 m) and the notification can take as little as three minutes. (Data provided by Cospas-Sarsat.)
Trace
#Love, backpacking, bass music, burning man, animal protein and dogs. <3


